PIPESIM is an engineering software from Schlumberger that used for pipeline or well simulation. A process engineer usually uses this software for hydraulic calculation across pipelines. Pipelines is a long pipe that connecting two places to distribute fluid, can be gas, oil, water or mix of those. The location of pipeline can be in offshore, onshore, underground, or above ground. Hydraulic calculation is needed whether to know pressure drop across pipeline or what size should be a pipeline, in certain flow, pressure, and temperature. The hydraulic calculation is using some correlations formula like Hagedorn & Brown, Beggs & Brill, and many other correlations.
In PIPESIM 2013, the software interface is quite different than older version. The new interface is like other software new interface (like newest version of Flarenet), following Microsoft Office interface. Actually it can be easier to operate but we need to familiar first with it. This post contains the steps to build pipeline simulation with new interface of PIPESIM 2013.
1. When opening software PIPESIM 2013, the first window that occurs is Workspace, like picture below:

There are two options we can choose: Network and Well. Choose Network - New to build new pipeline simulation (either single branch or network). There is also License Information which state the license we can use, indicated by green button. Basic licenses we can use are PIPESIM single branch and Multiflash base. If want to use other license (indicated by red button) such as PIPESIM network modelling, OLGA, etc., we shall contact Schlumberger to buy the other license.
2. After choose Network - New, appear the new workspace where we can build the simulation. The pipeline simulation that I build is a single branch type. A platform named ZUD is connected to Junction named ZUJ-1 via pipeline under water (offshore). Between pipeline and platform, there is riser to connect both of them. Here is the picture:

Beside Workspace tab, there are Home, Setup, Insert, and Format tab. Click Insert to input Source, Riser, Junction, Flowline, and Sink like the picture above.
3. Double click Source, then will appears table below. Insert Name and Temperature data.

4. For fluid model, click New.. button to input the fluid data in Source table. I use black oil fluid model since available data support this fluid model. You can choose black oil or compositional by clicking it on the Setup tab. Fluid data table is like picture below:

Input Name (in the top of table), Water Cut, Gas Oil Ratio, and API (in Properties tab), also Viscosity Data (in Viscosity tab), based on the data. Click Close, and choose ZUD as Fluid in Source table.
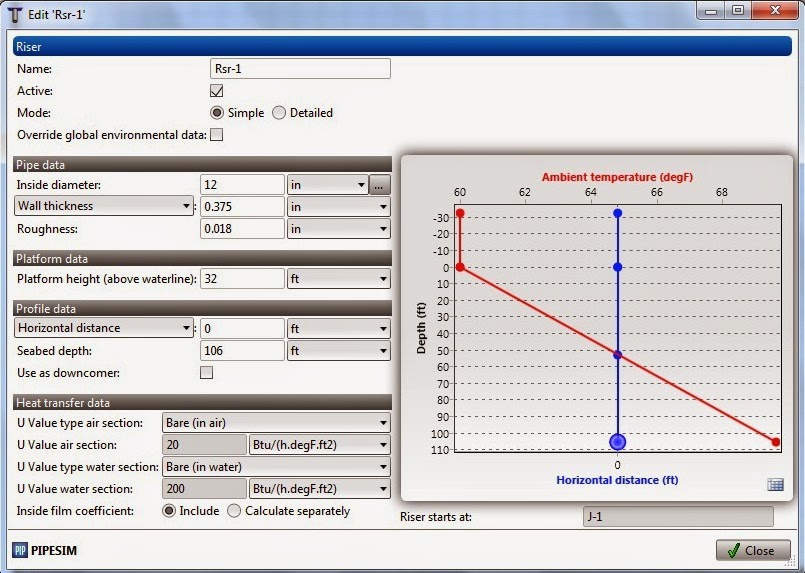
5. Double click Riser to appear table like this:

Input pipe data (inside diameter, wall thickness and roughness), platform data (platform height), profile data (horizontal distance, seabed depth, and use as downcomer or not), and heat transfer data (U value type in air and water section).
6. Double click flowline to appear table like this:

Input pipe data (inside diameter, wall thickness and roughness), profile data (rate of undulations, horizontal distance, elevation difference, and depth at start), and subsea heat transfer data (U value).
7. Double click another Riser to input data, same as point 5.
8. Double click Sink to appear table like this:

Input name, pressure, and liquid flowrate.
9. Click Setup - Simulation to input flow correlations like picture below:

Input flow correlations for vertical flow, horizontal flow, and single phase as per available data or Company requirement.
10. Click tab Environmental to appear table like this:

Input general data, air data, soil data, metocean data as per available data or Company requirement.
11. After input all necessary data, the simulation can start to run. In my simulation, I want to know backpressure at ZUD Platform. Click on Source (on pipeline modelling) - Home tab - P/T Profile to run the simulation. If we don't click Source (on pipeline modelling), P/T Profile can not be clicked. Only Network Simulation button that can be clicked. But since the pipeline modelling is a single branch, we can choose P/T Profile for this calculation. For Network Simulation, another license is needed to activate it. Below is the P/T Profile table that appears after clicking it in Home tab:

Choose inlet pressure as calculated variable and input outlet pressure and liquid flowrate as per available data. Click Run to run the simulation.
12. The profile result is as per figure below:

From figure above, we get the inlet pressure = 56.77 psia.
13. To know another variable beside pressure, you can click "Show grid" and appears table like this:

14. If you want to add another variables beside on the table above, click "Select columns" and search variable you want to add (for example viscosity, velocity, etc). If you can not find variables you want to add (for example density), go to Setup tab - Simulation - Output variables tab. On report template choose Flow Assurance, click Profile button, search
density. You will find some density variables like flowing gas density,
flowing liquid density, etc and than clone it and name it (for example
as ZUD). The appearance of output variables will be like this:

Back to P/T Profile, show grid, select columns, and now you can add density in the table.
15. If you want to print output summary or output details make sure you go to Workspace tab - Options - Advanced and check the "Show engine output files" like this:

16. Output summary appears beside the profile result in P/T Profile. Right click on output summary to save it in text format.

17. Output details appears beside output summary. Right click on output summary to save it in text format.

18. To change units you want to use, go to Workspace tab - Options - Units.

Last words, this new PIPESIM version actually is facilitated with message center, validation and progress monitor which located at the bottom of the window. There are message for Errors, Warnings, and Information that we can use for building simulation easier even though we have not familiar with this version. You can also visit Help in the Workspace tab if there is something you can not understand about simulation.
So, enjoy your new PIPESIM version! :D
No comments:
Post a Comment